Tuesday, February 26, 2008

Barefoot Contessa's French Lentil Soup

I really like soup. I usually make a lot of soup in a winter, however I realized I've relied on old favorites this winter and not really branched out. There are certain classic recipes that I turn to time and time again. This happens to be one of them. It is from the original Barefoot Contessa cookbook, and is flavorful and lentil-y.... in a good way.

This recipe yields a lot of soup. Sometimes I'm really great at making it through a recipe before getting sick of it. This was not one of those times. I hate wasting food, and try very hard to keep it from happening. But sometimes it does. So, if you're cooking for two (or fewer then the 8-10 servings in the recipe, I would consider making a half batch. Or getting one's act together soon to freeze portions. That was my plan, but the act getting didn't quite happen.

So, here's a tried and true which gets made at least once a year in my kitchen. I often forget to say this, but I always sub veggie broth. And doing so would also make it vegan. Enjoy!

Barefoot Contessa's French Lentil Soup
Barefoot Contessa
Recipe by Ina Garten
Serves - 8 -10
  • 1 pound French green lentils, picked over and rinsed
  • Boiling water
  • 1/4 cup extra-virgin olive oil, plus more for serving
  • 3 large onions, chopped
  • 3 medium garlic cloves, minced
  • 2 large leeks, white and tender green parts only, chopped
  • Kosher salt and freshly ground pepper
  • 1 tablespoon chopped thyme
  • 1 teaspoon ground cumin
  • 8 celery ribs, cut into 1/2-inch dice
  • 6 medium carrots, cut into 1/2-inch dice
  • 3 quarts chicken stock or low-sodium broth
  • 1/4 cup tomato paste
  • 2 tablespoons dry red wine or red wine vinegar
  • Freshly grated Parmesan cheese, for serving
  1. In a large heatproof bowl, cover the lentils with boiling water and let stand for 15 minutes. Drain and set aside.
  2. Meanwhile, heat the olive oil in a large pot. Add the onions, garlic, leeks, 1 tablespoon of salt, 1 1/2 teaspoons of pepper and the thyme and cumin and cook over moderate heat, stirring occasionally, until the vegetables are very tender, about 20 minutes.
  3. Add the celery and carrots and cook until they begin to soften, about 10 minutes. Add the chicken stock, tomato paste and lentils to the pot. Increase the heat to high, cover and bring to a boil. Uncover, reduce the heat to moderate and simmer, stirring occasionally, until the lentils are tender, about 1 hour. Stir in the red wine and season with salt and pepper to taste. Serve hot with a drizzle of olive oil and a sprinkling of Parmesan.

Note - Lentil soup often thickens as it stands, so it can be helpful to add additional broth to leftovers.

Thursday, February 21, 2008

Quinoa Muffins

I am a creature of habit. Sometimes distressingly so. I tend to follow the same path (give or take a green light or two) when walking to the subway each morning. Every evening when I walk in the door I enjoy a mug of hot Earl Grey tea while catching up on the day's emails. And, for the past two or more months, I've had oatmeal for breakfast just about every workday.

Now, I love oatmeal. It's a nice and hearty breakfast that is both filling, whole grain and healthy. But, sometimes too much of a good thing is still too much. And I reached that point this week. Breakfast had to change.

When I read through food magazines, recipes will often jump out at me but will be put aside until the time is right. This muffin recipe was one such example. I thought it sounded intriguing when I saw it in January. But the mood didn't strike me to make it until this week. These muffins are cool. There's no other way to describe them. Quinoa in muffins - brilliance! The quinoa provides a nutty, chewy texture which is complimented by the sweetness of the brown sugar. And because quinoa contains a lot of protein, one muffin with a swathe of light cream cheese did quite well at keeping the hunger monsters at bay.

Two thumbs up, both as a recipe for an interesting whole grain muffin, and for keeping me from drowning in oatmeal monotony.

Quinoa Muffins
Every Day Food Magazine - January 2008
Makes 12
Prep - 25 minutes
Total time - 1 hour

Every Day Food's notes - Instead of oat or bran muffins, try these moist breakfast treats to fuel your morning. Substitute other chopped dried fruit for the raisins, if you like.

My notes - I baked the muffins in liners sprayed with a quick squirt of PAM because I'm too lazy to do the greasing and flouring step called for in the recipe. And they came out great.

1 cup quinoa, rinsed
1/4 cup vegetable oil plus more for pan
2 cups all purpose flour (spooned and leveled) plus additional for pan
3/4 cup packed dark-brown sugar
1 1/2 teaspoons baking powder
1 teaspoon salt
1/2 cup raisins
3/4 cup whole milk
1 large egg
1 teaspoon pure vanilla extract

1.Preheat oven to 350 degrees. In a medium saucepan, bring quinoa and 1 cup of water to a boil. Reduce to a simmer, cover and cook until water has been absorbed and quinoa is tender. 11-13 minutes.
2.Meanwhile, brush a standard 12 cup muffin pan with oil, dust with flour, tapping out excess. In a medium bowl, whisk together flour, sugar, baking powder, salt, raisins and 2 cups cooked quinoa. Reserve any leftover quinoa for another use.
3.In a small bowl, whisk together oil, milk, egg and vanilla. Add milk mixture to flour mixture, and stir just until combined. Divide batter among prepared muffin cups.
4.Bake until a toothpick inserted in center of a muffin comes out clean, 25-30 minutes. Cool muffins in pan for 5 minutes. Transfer to a wire rack to cool completely. Store in an air-tight container for up to five days.

Additional Every Day Food note - Be careful not to overcook the quinoa or to use more then the required amount of water. The grains of quinoa should be tender but separate, rather then mushy and clumped together.

Monday, February 18, 2008

Vanilla Bean Loaves

Hello February! January, where did you go? Things have actually been bubbling away here in the Veggie Kitchen, but a number of factors have collided to make my sharing of them somewhat more challenging. First of all, our computer has begun a slow descent into the depths it shall not resurface from. It is old, as computers go, and has begun to struggle to handle the demands I place upon it. It tends to get stuck between wesbites, churning away desperately trying to get somewhere, but stuck in blankness. The other trick of which I am so fond is randomly closing and opening windows on me. That's fun for everyone involved. This growing technological crisis, plus an increase to my work schedule has meant less time spent both on the computer and in the kitchen (at least during the week).

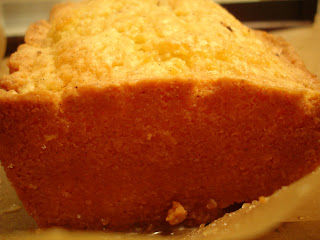
Still, I hope the backlog of pictures and recipes I have will enable to me to move forwards, dragging my unwilling technology partner as I go. Today's offering is a delightful poundcake encrusted with a delicious vanilla-y sugary crust. I made the recipe as written, although I did not take the time to make the vanilla sugar called for in the recipe. Ms. Hesser's instructions are to place a vanilla pod into a pound of sugar and allow to sit for several days. Easy enough to do, but not fast enough for my "I want to bake this cake NOW!" mood experienced on Saturday. Between the tablespoon of vanilla also in the cake, not to mention frequent applications of a vanilla steeped simple syrup to the cooling cake, I did not find this cake lacked vanilla-ness in any way. But, if you are a purist then I suppose a little vanilla sugar will never hurt.

M. and I both liked the crunchy crust created by applying the sugar syrup to the cooling cake. That stuff got everywhere, but the results were worth the sticky fingers (and tables, and utensils, and books and....). I used all of it (although I will admit the last application was primarily dumping the syrup onto the cake because I'd grown a bit weary of delicately applying it with a brush). The cakes were baked on Saturday, sampled and then refrigerated in multiple layers of Saran Wrap. Sunday's tasted was denser but still tasted fresh and delicious. This is a dense and sweet cake, a little definitely goes a long way. Small portions are key to not suffering a tremendous sugar high! But, served with a touch of whipped cream, this was a delicious and easy dessert. Since the recipe makes 2 loaves, this is a perfect cake to make for yourself and a friend (or in my case, M.'s coworkers).
Vanilla Bean Loaves
Cooking For Mr Latte by Amanda Hesser

3 sticks unsalted butter, room temp.
2 1/2 cups vanilla sugar
1 vanilla bean
1 tablespoon vanilla extract
8 large eggs, room temp.
3 cups All Purpose flour
1 1/2 teaspoons baking powder
1/2 teaspoon salt

for the syrup:
1 3/4 cups sugar
2 vanilla beans, split and scraped

1. Heavily butter two 8 x 4 inch loaf pans. Preheat oven to 325 degrees. Cream butter and sugar until fluffy and pale. Scrape the vanilla bean and flick the seeds into the mixer, along with the vanilla extract and eggs. Beat to mix.
2. Sift together the flour, baking powder, and salt. Add to the butter mixture and mix just until smooth. Take the bowl off the mixture and scrap the bottom with a spatula and fold the batter a few times. Divide the batter between the two buttered pans. Bake for 30 minutes, then rotate the pans. Bake an additional 25 to 40 minutes, or until a skewer comes out almost clean.
3. While the loaves are baking, prepare the syrup. In a small pan dissolve the sugar in one cup water over medium heat. Add the vanilla beans and stir a little so the seeds and fragrance disperse. When the sugar mixture is completely dissolved, remove from heat.
4. When the loaves are done, cool for 10 minutes on racks and then turn them out of the pans onto racks over parchment paper. Brush generously with the vanilla syrup on all sides and tops and bottoms. Brush a couple of times as the loaves cool. These cakes store well. They may be wrapped and frozen.

2 fragrant cakes